Traditional acrylic extensions take hours to apply. They often leave your natural nails thin, brittle, and completely damaged. If you love long, flawless nails but hate harsh chemical smells, you are stuck. Gel-X extensions solve this exact problem. They provide a lightweight, damage-free alternative. You get flawless salon results in half the time. This guide covers everything about this new system.
What is Gel X Nails? The Basics
Gel-X is a full-coverage soft gel extension system. The brand Aprés Nail originally created it. Regular tips only glue to the very edge of your nail. These extensions are different. They cover your entire nail bed from the cuticle down to the front edge.
The entire extension consists of actual gel polish. It is not hard plastic. Nail technicians use a soft gel adhesive called Extend Gel to bond it. Then, they cure it under a mini LED light.
This method removes the need for acrylic monomer smells and heavy filing. The tips come pre-shaped and pre-buffed from the factory. You can get them in almond, coffin, square, or round shapes. They range from extra short to extra long sizes. They feel highly flexible and lightweight on your hands.
Inside a Complete Gel X Nail Kit
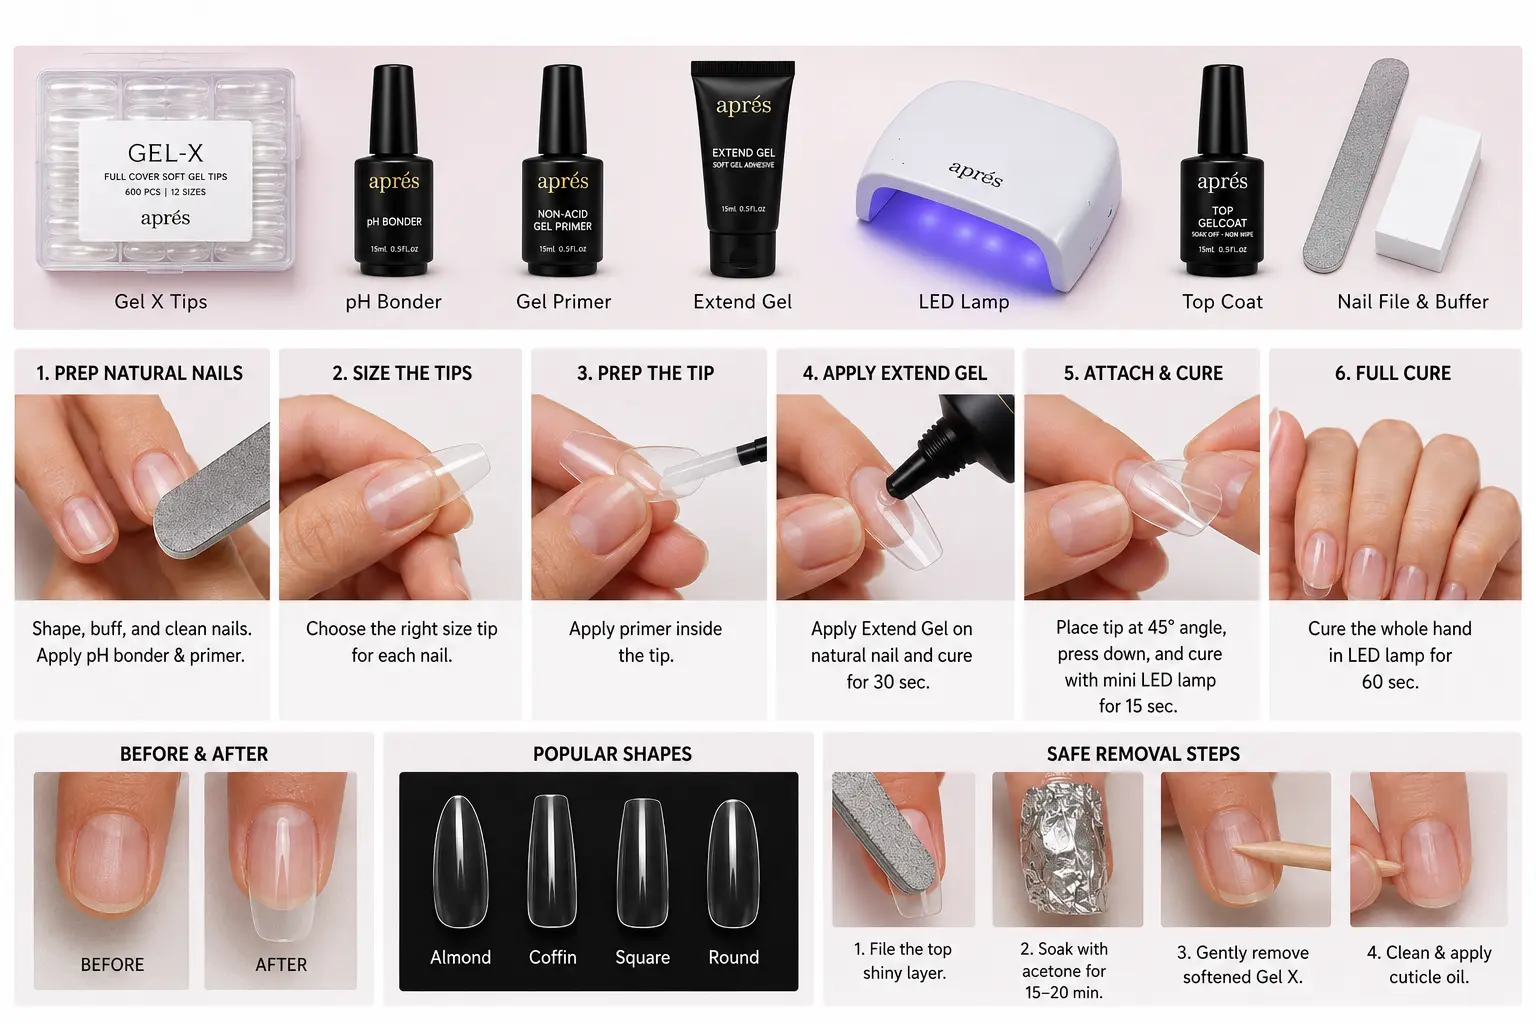
You must know the tools to get good results at home. A complete Gel x Nails kit uses specific products that work together.
The main part of the kit is the box of full-coverage gel x nail tips. These clear, flexible tips come in different numbers to fit your fingers. Next is the pH bonder and a non-acid gel primer. The bonder dries out oils from your nail surface. The primer creates a sticky base so everything sticks without damage.
The most crucial liquid is the soft gel extension adhesive. This clear gel acts as your glue. To dry this adhesive, you use a mini LED flash-curing lamp. This tiny lamp lets you hold the nail with one hand while drying it for a few seconds. Finally, you need a top coat and a main LED lamp to cure the whole hand.
How to Apply Gel X Nail Extensions Step by Step
Good preparation decides how long your extensions stay in your hands. Skipping prep steps causes early lifting. It also traps moisture under the gel. Follow these steps carefully.
Step 1: Natural Nail Preparation
Clean all old polish from your nails first. Push back your cuticles gently with a wooden stick. Use a fine nail buffer to take away the natural shine. Wipe the nail dust with alcohol. Apply the pH bonder to dry the surface, then add the non-acid primer.
Step 2: Sizing the Tips
Find the right size for each finger from your gel x nail extensions box. The extension must cover your nail from side to side. It should not touch your skin or cuticles. If a tip feels too wide, file the sides down until it fits perfectly.
Step 3: Prepping the Extension Tip
Put a little non-acid primer inside the nail tip. Apply it only where the tip touches your natural nail. This roughs up the inside plastic and creates a much stronger bond.
Step 4: Applying the Adhesive and Curing
Spread a thin layer of Extend Gel on your natural nail. Cure it for 30 seconds under your main LED lamp. Now, put a small drop of the same gel inside the base of the extension tip.
Hold the tip at a 45-degree angle near your cuticle line. Press it down slowly toward the front edge to stop air bubbles. Hold it tight and place your finger under the mini LED lamp for 15 seconds. Once all fingers are done, put your whole hand in the big LED lamp for 60 seconds.
Gel X Nails vs Acrylic: Which is Better?
Choosing a method depends on nail health, time, and durability. Acrylics are famous, but soft gel systems offer better benefits today.
Feature
Gel-X Extensions
Traditional Acrylic Nails
Material Base
100% Soft Gel Polish
Acrylic Powder and Liquid
Application Time
45 to 60 minutes
90 to 120 minutes
Odor and Fumes
Totally odorless
Very strong chemical smell
Flexibility
Bends with natural nail
Rigid, stiff, and heavy
Removal Method
Acetone soak-off
Heavy drilling needed
Nail Damage
Very low risk
High risk of thinning
Acrylics require mixing liquid monomer with powder. This creates a thick paste and produces strong fumes that burn the nose. Gel-X uses pre-made shapes. This makes your salon visit much faster.
Acrylic nails are rigid and never bend. If you hit an acrylic nail against something hard, it hurts your nail bed. It can rip your real nail. Soft gel tips absorb the shock because they are flexible. They feel comfortable for daily work.
How Long Do Gel X Nails Last?
A good application lasts 3 to 4 weeks without any lifting. The lifespan depends on your daily chores, nail growth, and hand protection.
These are full-coverage extensions, so they move up as your real nail grows. After three weeks, you will see a gap near your cuticles. Professionals do not fill soft gel extensions like acrylics. You have to remove the whole set and apply a new one after a month to keep them clean.
To make them last, wear gloves when doing dishes or using cleaning liquids. Do not use your nails to open soda cans. Rub cuticle oil on your fingers every day to keep them hydrated. This stops the gel edges from peeling up.
Trendy Gel X Nail Designs and Polish Ideas
These extensions are clear and smooth, creating a perfect base for artwork. You can use standard gel x nail polish for bright colors that do not chip.
If you like short, easy nails, search for short gel x nails ideas. Short almond or square shapes look clean. You can paint them with nude colors, milky white, or a basic French tip. Short styles are great for typing on keyboards.
If you love wild styles, gel x nail designs offer many options. Try chrome dust, abstract lines, or ombré shades. The smooth surface helps nail brushes move smoothly. You can also attach cute Nail Charms onto your top coat. Cure them under the LED light to get a beautiful 3D look.
Bad removal causes almost all nail damage. Never pull or pry the tips off your fingers. This action rips the top layers of your natural nail plate. Use this safe acetone method instead.
Step 1: Cut and File
Use a strong nail clipper to cut the long extension down. Stop near your real nail length. Take a rough hand file or nail drill and scratch off the top shiny layer of gel polish. This helps the acetone soak in much faster.
Step 2: Soak in Acetone
Wet a cotton ball completely in pure acetone. Put the wet cotton on your nail bed. Wrap a piece of aluminum foil tightly around your finger to hold it. Do this for all fingers and wait 15 to 20 minutes.
Step 3: Gently Scrape
Take the foil wraps off one by one. The soft gel should look soft, wrinkled, and melted. Use a wooden stick to scrape the soft gel away easily. If the gel is still hard, wrap it again for 5 more minutes. Wash your hands well and apply plenty of cuticle oil.
Frequently Asked Questions
Can you use regular nail polish on Gel-X extensions?
Yes, regular polish works fine on top of these extensions. Keep in mind that regular polish dries slowly and chips faster than gel. If you like changing colors often, use regular polish. Clean it off later with non-acetone remover so the extensions stay safe.
Are Gel-X extensions safe for weak, thin nails?
Yes, they are safer than acrylics because you do not sand the natural nail down heavily. The lightweight material puts less weight on weak fingers. It acts like a shield while your real nail grows underneath.
Why do my Gel-X nails keep popping off?
Nails pop off early because of bad prep or wrong sizing. Leaving natural oil on your nail plate stops the glue from bonding. Using too little gel or leaving air bubbles also makes the structure weak, causing the tip to drop off.