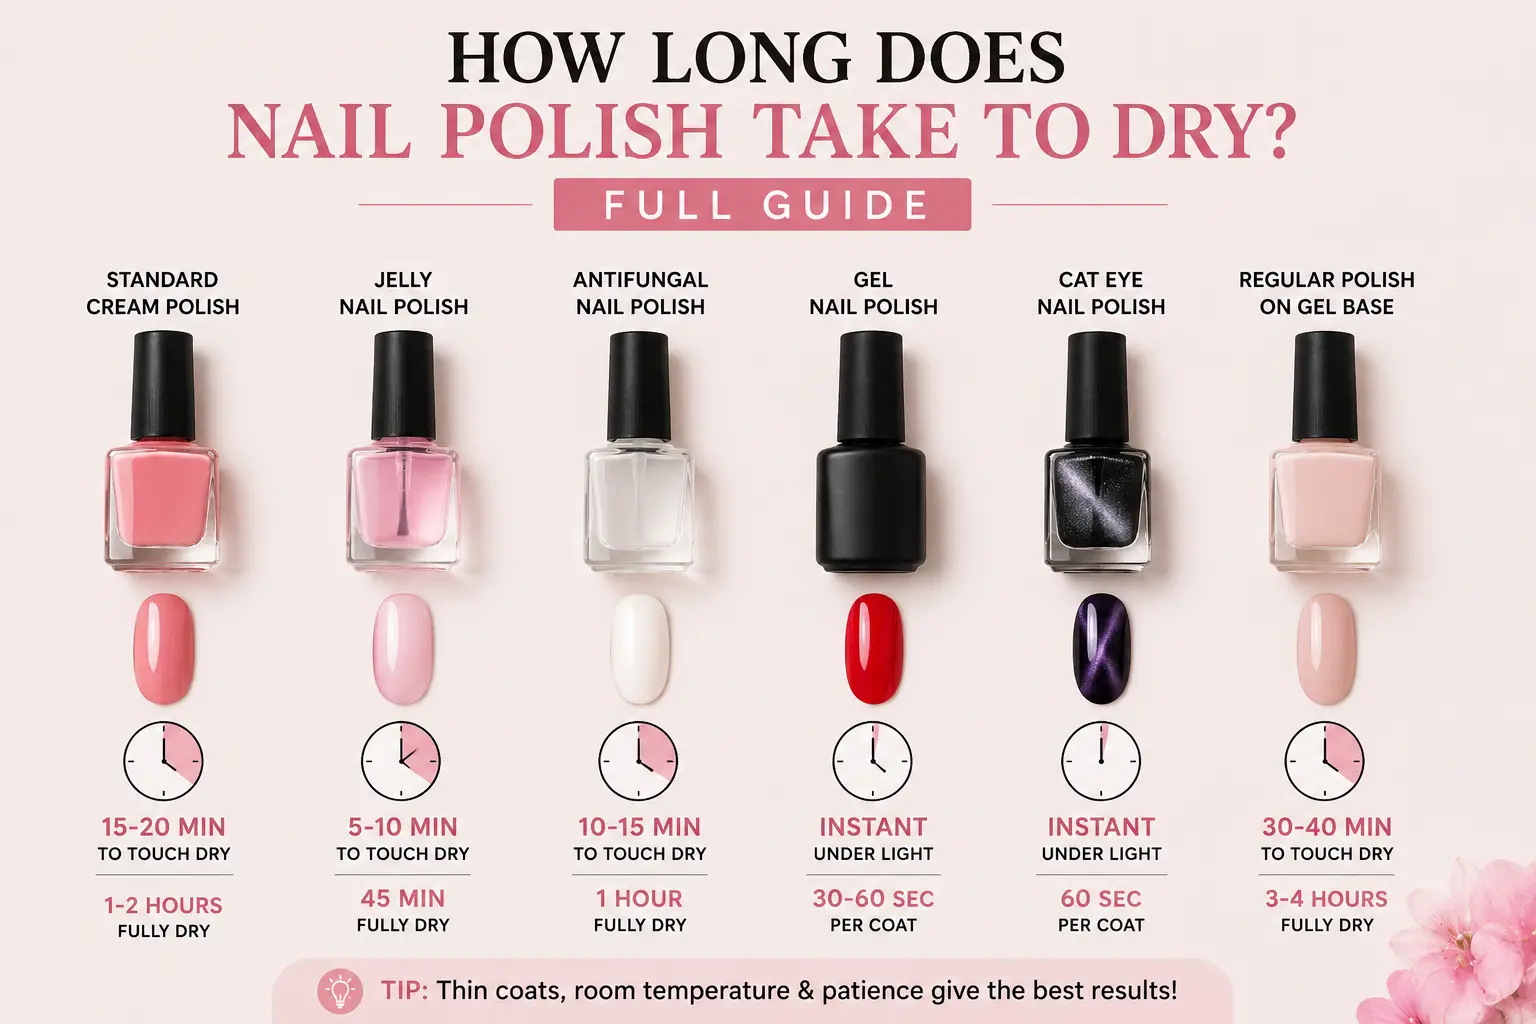
Waiting for nail polish to dry is incredibly annoying. You sit perfectly still for twenty minutes, think your nails are safe, and reach for your car keys or phone. In a split second, your fresh polish gets a deep smudge or a flat dent right down the middle. This mess ruins your mood and wastes your time. You do not have to guess your drying window anymore. This real guide gives you the exact timing windows for every single type of polish you own.
Complete Nail Polish Drying Time Matrix
Different nail polishes do not dry the same way because their chemical recipes are completely different. Traditional regular bottles dry through simple evaporation, where the liquid liquids lift into the air and leave hard color behind. Gel products use a completely separate system. They never air-dry on their own; instead, they change into solid plastic only when UV or LED light beams hit them.
The table below provides the exact timeline required for both initial touch dry status and complete chemical curing across various polish categories.
Nail Polish Type
Time to Touch Dry
Time to Full Curing / Smudge-Proof
Curing Mechanism
Standard Cream Polish (Pink, Beige)
15 – 20 Minutes
1 – 2 Hours
Air Dry (Solvent Volatilization)
Jelly Nail Polish
5 – 10 Minutes
45 Minutes
Air Dry (Low Pigment Load)
Antifungal Nail Polish
10 – 15 Minutes
1 Hour
Air Dry (Medicinal Evaporation)
Gel Nail Polish
Instant under light
30 – 60 Seconds per coat
UV/LED Lamp Polymerization
Cat Eye Nail Polish
Instant under light
60 Seconds per coat
UV/LED Lamp + Magnetic Alignment
Regular Polish on Gel Base
30 – 40 Minutes
3 – 4 Hours
Delayed Air Dry (Non-Porous Base)
Understanding Standard Air-Dry Polishes
Regular nail polish stays wet inside the bottle because it needs liquids to keep it runny. When you paint a layer onto your nail, those liquids slowly dry out and disappear into the air. Once all the wetness goes away, only the hard color is left behind on your hand. This natural drying process is not always the same speed. It changes depending on how warm your room is, how heavy you paint your layers, and the exact color shade you choose from your collection.
Cream Finishes (Pink Nail Polish and Beige Nail Polish)
Pink nail polish or beige nail polish are opaque shades and have a high pigment density. Manufacturers add a lot of titanium dioxide to make these colors chalky, solid and full coverage.This heavy white pigment creates a dense internal viscosity inside the formula.
When you apply these colors, the heavy mineral pigments trap the volatile solvents underneath the surface layer. The top layer might feel completely dry to a light touch after twenty minutes. However, the internal layers remain soft and malleable for up to two full hours. A heavy impact during this window will push the soft bottom layer out of place, causing a deep dent or a visible smudge.
Jelly Nail Polish
Jelly nail polish uses a completely different formula configuration. These are translucent, sheer, glassy lacquers with a minimal pigment load. Because the formula lacks heavy titanium dioxide or dense colorants, the volatile solvents can escape into the atmosphere with zero physical resistance.
Jelly formulas dry to a touch-safe state within ten minutes. They reach a complete smudge-free threshold in less than forty-five minutes. If you want a fast manicure that requires multiple layers without a long waiting time, sheer jelly formulas provide the most efficient air-dry experience.
Antifungal Nail Polish
Antifungal nail polish refers to a special kind of medicine that is used on nails and is used to treat active ingredients like amorolfine or ciclopirox directly into the nail plate. These formulas are designed to penetrate deeply into the nails, not to give them a high shine or cosmetic thickness.
Medical lacquers use very volatile chemical carrier fluids to get the active ingredients to bind to the keratin fibers rapidly. As a result, antifungal options dry to the touch within fifteen minutes. They reach complete hardness within an hour, allowing you to wear socks or shoes without transferring the product onto the fabric.
The Technology of Gel Polish and Special Effects
Gel polish is nothing like regular nail polish because it never dries in the air. You can leave a bottle of gel wide open in a dark bedroom for weeks, and the liquid inside will stay completely wet and runny. It has zero ingredients that can evaporate on their own. To make it hard, you must put your fingers under a special nail lamp. The bright light from the lamp forces the wet liquid to lock together tightly in less than a minute, turning it into a solid, tough shield.
What is Gel Nail Polish?
Gel nail polish is just a thick liquid that only changes when nail lamp light hits it. When you put your hand inside the professional lamp, the strong light beams instantly wake up the wet color. All the loose, wet parts inside the polish grab onto each other and freeze in place. This whole step takes less than a minute, leaving you with rock-hard nails that will not bend, dent, or smudge at all.
The Gel Curing Workflow:
Phase 1: Apply the Liquid Gel Layer
Phase 2: Expose to UV or LED Photon Waves
Phase 3: Trigger Chemical Polymerization
Phase 4: Solid Cured Manicure Complete
This chemical transformation occurs within thirty to sixty seconds under a proper lamp setup. Once the timer completes, the structure is instantly solid. However, you must note that regular gel formulas always leave behind an oxygen inhibition tacky layer on the surface. This sticky film is a normal byproduct of the chemical reaction. It does not mean your polish is wet. Wiping this layer with a lint-free alcohol pad reveals the rock-hard, glossy finish underneath.
Cat eye nail polish contains regular gel resins blended with micro-fine, three-dimensional magnetic iron dust particles. This special additive alters how you must approach the drying and curing timeline.
Before placing your hand inside the LED lamp, you must hover a specialized magnet over the wet layer for five to ten seconds. The magnet pulls the heavy iron dust particles through the liquid viscosity to create a shimmering, velvet optical line. Because these heavy metallic particles shift during the process, you must use a technique called flash curing. You place the nail under the curing light for five seconds immediately after using the magnet to lock the iron particles into place. After completing all ten fingers, you run a full sixty-second cycle to ensure complete deep polymerization through the dense metallic layer.
The Sandwich Dilemma: Regular Polish on Gel Nails
Many people attempt to apply standard regular nail polish over a professional gel base coat or a full set of cured builder gel extensions. This technique allows you to change your cosmetic nail color frequently at home while retaining the strength and structural reinforcement of an underlying gel architecture. However, this pairing creates a severe drying roadblock.
Natural human nails are highly porous structures that breathe, absorb moisture, and allow standard lacquer solvents to partially vent downwards. Cured gel surfaces are completely non-porous, smooth, synthetic plastic shields.
When you place standard air-dry lacquer directly over a cured gel layer, the volatile solvents are entirely trapped. They can only escape upwards through the top surface of the regular polish. This structural limitation cuts the oxygen footprint in half and slows down the solvent volatilization process significantly. Regular polish applied over a gel base takes up to forty minutes to become touch-safe. It requires up to four hours of careful management before it passes the true smudge-proof threshold.
Advanced Diagnostic Troubleshooting
Ever been manicured, waited an hour and found that the polish is coming off your nail plate like a rubber band? This is a common problem that can be caused by solvents trapped beneath the top layer.
When lacquer is applied in thick layers, the top layer dries first, forming an airtight seal if regular lacquer is used. Your natural nail plate does not bond with the nitrocellulose because the liquid solvents in the bottom layer remain and are permanently trapped against your natural nail plate. The entire structure is soft, unstable and has a high susceptibility to lifting. This is only possible by applying thin coats and allowing the solvents to evaporate after each coating by allowing 3-5 minutes between coats.
Professional FAQ Hub
How to Make Nail Polish Dry Faster
You can utilize several verified physical methods to accelerate the evaporation speed of standard regular nail polish:
Fast Dry Top Coats: These are special-purpose top coats with a lot of fast-evaporating polymers which actively move the solvents up through the coat as it dries.
Dryer Drops: Cosmetic drying drops use volatile silicones to remove the organic solvents from the lacquer layers, thus reducing the surface dry time to less than 3 minutes.
The Ice Water Myth: Placing wet nails into a bowl of ice water is a common internet trend, but it is counterproductive. The freezing temperature thickens the nitrocellulose oils, making the polish look dry on the surface. However, the cold water stops solvent evaporation completely, leaving the lower layers completely soft. Once your hands warm back up to room temperature, the manicure will smudge instantly.
How to Thin Nail Polish
Over time, opening your favorite nail polish bottle allows the essential solvents to escape into the room. This loss of fluid alters the internal viscosity, leaving you with a thick, stringy, and clumpy formula that takes hours to dry. You can restore the original balance with a systematic approach:
1.Acquire Pure Cosmetic Thinner
Do not use acetone
Purchase a professional nail polish thinner containing only butyl acetate and ethyl acetate. Never use pure acetone, as acetone breaks down the chemical nitrocellulose bonds permanently and destroys the formula gloss.
2.Add Minimal Drops
Precision control
Open your thick polish bottle and add exactly two to three drops of the professional thinner into the neck of the bottle.
3.Roll the Bottle
Prevent internal air bubbles
Close the cap tightly. Roll the bottle vigorously between the palms of your hands for sixty seconds. Do not shake the bottle up and down, as shaking introduces trapped air bubbles that will ruin your next application.
How to Apply Gel Nail Polish Efficiently
To achieve a durable, long-lasting gel finish without shrinkage, wrinkling, or under-cured pockets, you must follow a clean application sequence:
1.Dehydrate the Nail Plate
Remove surface oils
Wipe your clean nail beds with ninety-nine percent isopropyl alcohol to remove all natural skin oils and residual moisture.
2.Apply an Ultra-Thin Base Coat
Prevent pooling
Scrape the brush against the bottle rim until it is nearly dry. Apply a microscopic layer of gel base coat, ensuring the product does not touch your cuticles or side skin walls. Cure for thirty seconds under an LED lamp.
3.Paint Thin Color Layers
Cure sequentially
Apply your chosen gel color or cat eye formula in paper-thin strokes. Cap the free edge of your nail tip to seal the plastic matrix. Cure each color layer for sixty seconds before applying the next coat.
For professional nail care strategies and trending accessories like nail charms, explore Nailperk.